How to get started on the MEAN stack
TL;DR
This will be a series of posts which will teach you how to take advantage of the MEAN stack in becoming a full-stack JavaScript developer. This first blog post will show you how to install the MEAN stack on your own development box (fancy name for your laptop/computer, so no need to buy any servers just yet). The second blog post, which is all about Node.js and Express is here. The third blog post, which is all about MongoDB is here.
Disclaimer: code is based on the MEAN.JS framework and the tutorial partly follows the structure from MEAN Web Development by Amos Haviv , the author of the MEAN.JS framework.
, the author of the MEAN.JS framework.
So, you're a web developer? Chances are you're using (or are familiar with) a LAMP stack), which comprises of the following components:
- Linux server on which you're running an
- Apache web server with
- MySql as a database and
- PHP as the backend language
Of course, if you're developing for the web, a knowledge of HTML and CSS is a must. Also, a solid knowledge of JavaScript (or/and a worldwide popular library jQuery) is also expected. So, if we take the knowledge of HTML and CSS as a must then, on top of that, in order to develop a decent web application you still have to have skills both in JavaScript (frontend ) and PHP (backend), plus the SQL for the database of your choice (could be you're using Postgres or MariaDB instead). Sure, I hear you, you also may use frameworks for PHP (Laravel, Zend, ...) or/and JavaScript (AngularJS, Ember, Backbone, ...) or/and CSS (Compass, less) but we'll get to that later.
One language to rule them all
So, instead of having to learn additional language to handle backend part of your application, with MEAN stack you can do everything that you could with a LAMP stack, but by using only one language -JavaScript!

All of a sudden a new profession emerged - a full-stack JavaScript developer. The benefits are great because now you can have a team of developers who are capable of developing more agile software together by using a single language across all layers.

If this got you interested, mindblown even, then read on...

What is MEAN, and why it's GOOD?
So, what is a MEAN stack? The idea is quite simple actually - you have 4 main parts:
- MongoDB as the database
- Express as the web framework
- AngularJS as the frontend framework, and
- Node.js as the server platform
These are some of the advantages of a MEAN stack:
- Single language is used in the whole application
- Support for the MVC pattern
- JSON is used for transfering data
- Node.js's huge module library
- Open source so you can tweak it to your preferences if you're an experienced user
Ok, enough with the chit-chat, now we'll go and install all the necessary parts.
Installing MongoDB
In order to download MongoDB, visit http://mongodb.org/downloads, where you'll see the following options:

The installation process outlined shortly is as follows:
- Download and extract the archive file
- Run mongod binary (usually located in the bin folder of the extracted archive)
- Create the folder to store the database files (the default folder is /data/db)
- Make sure port 27017 is free to use
What follows now is a detailed description of how to install MongoDB on all three mayor operating systems: Windows, MacOS X and Linux.
Installing MongoDB on a Windows machine
Once you downloaded the right archive version for your system, unpack the archive file, and move the folder to C:\mongodb. MongoDB uses a default folder to store its files, and on Windows machine the default location is C:\data\db, so in order to create a new folder by using the command prompt (if you long for a better command prompt than what Windows offers by default, give the Console2 a try, and check out how to customize it), go to C:\ and execute:
C:\>mkdir data\db
Please note that, of course, you have to enter just mkdir data\db, as the C:> is already there, and I'm including it here just for clarity since I bet all of the readers are familiar with this fact.
Now you have two options for running a MongoDB service:
- running manually
run the mongod binary by executing the following command in command prompt:
C:\>mongodb\bin\mongod.exe
This started the MongoDB service on a default 27017 port, and if everything went well you should see a console output like the one on the screenshot below:


- running as a Windows service this may be a more favorable solution because you won't have to start the MongoDB service manually every time you reboot your computer, instead Windows service will start it automatically after reboot. In order to do so, you first have to create a log file by executing:
C:\>mkdir C:\mongodb\log
Now, create a configuration file by executing:
$ echo logpath=C:\mongodb\log\mongo.log > C:\mongodb\mongod.cfg
Next, open up a new command prompt window with administrative privileges (you can do this by right-clicking on the command prompt icon and clicking on Run as administrator). Finally, to install the MongoDB as a service execute:
$ sc.exe create MongoDB binPath= "\"C:\mongodb\bin\mongod.exe\" --service --config= \"C:\mongodb\mongod.cfg\"" DisplayName= "MongoDB 2.6" start= "auto"
Please note that the space after = is intentional as per the instructions in the help file of the sc.execommand. If the service was successfully created, you will get the following log message:
[SC] CreateService SUCCESS
After installing your MongoDB service, you can run it by executing the following command in the administrative command prompt window:
$ net start MongoDB
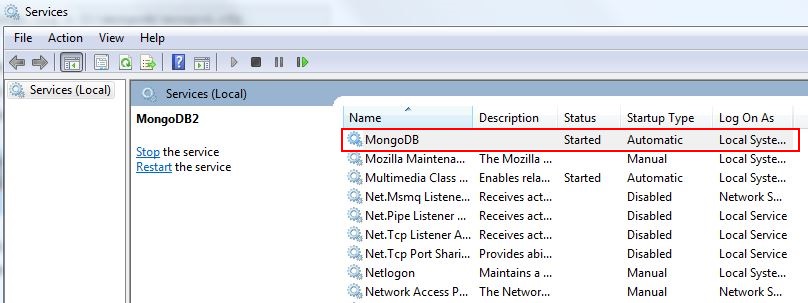
Also, you can view the status, stop or run the existing services on Windows if you run the following command:
$ services
The following window will appear, and you can see your newly created and started service MongoDB, as on the image below:
Installing MongoDB on Mac OS X and Linux
You have an option to install the MongoDB by using the package manager specific to your distribution:
- Red Hat Enterprise, CentOS, Fedora, or Amazon Linux: http://docs.mongodb.org/manual/tutorial/install-mongodb-on-red-hat-centos-or-fedora-linux/
- Ubuntu: http://docs.mongodb.org/manual/tutorial/install-mongodb-on-ubuntu/
- Debian: http://docs.mongodb.org/manual/tutorial/install-mongodb-on-debian/
- Mac OS X: http://docs.mongodb.org/manual/tutorial/install-mongodb-on-os-x/
But here I'll show you how to install it by using binaries from the MongoDB download page. Once you downloaded the right archive version for your system, unpack the archive file, and move the folder to your desired location (sure, you can put it on your desktop if you wish). MongoDB uses a default folder to store its files, and on Linux and Mac OS X machines the default location is /data/db, so in order to create a new folder by using your command-line tool you'll have to execute:
$ mkdir -p /data/db
but most probably you'll have to do it with a sudo command because of permission errors. The -p flag creates the parent folder also, so in the command above, both data and db folders were created. Since the default storing folder is not in your home folder, you'll have to make sure you set yourself correct permissions for this folder, and you can do this by executing the following command:
$ sudo chown -R $USER /data/db
Now, in order to start the mongod service, go to the bin folder of the archive you downloaded and execute mongod command from within your terminal. This will run the main MongoDB service, which will be listening on the default 27017 port. If all goes well, you should see a console output similar to the one on the image below:
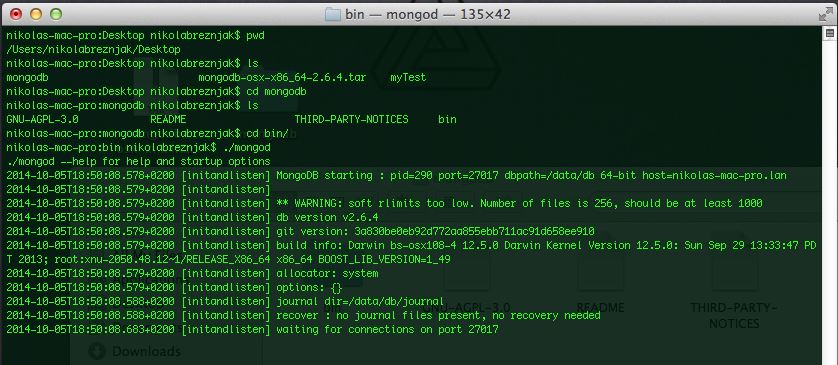 Click on the image for a larger version
Using the MongoDB shell
The MongoDB archive file which you've downloaded has the MongoDB shell, which allows you to interact with your MongoDB server instance through a terminal. To start the shell, you have to run the mongoexecutable in the bin folder of the archive file. If all went well, the shell automatically conected to the local MongoDB server instance (to the test database) and the terminal in which we've started the mongodservice earlier (notice the d) informs us that the new connection has been made, as you can in the left window on the image below:
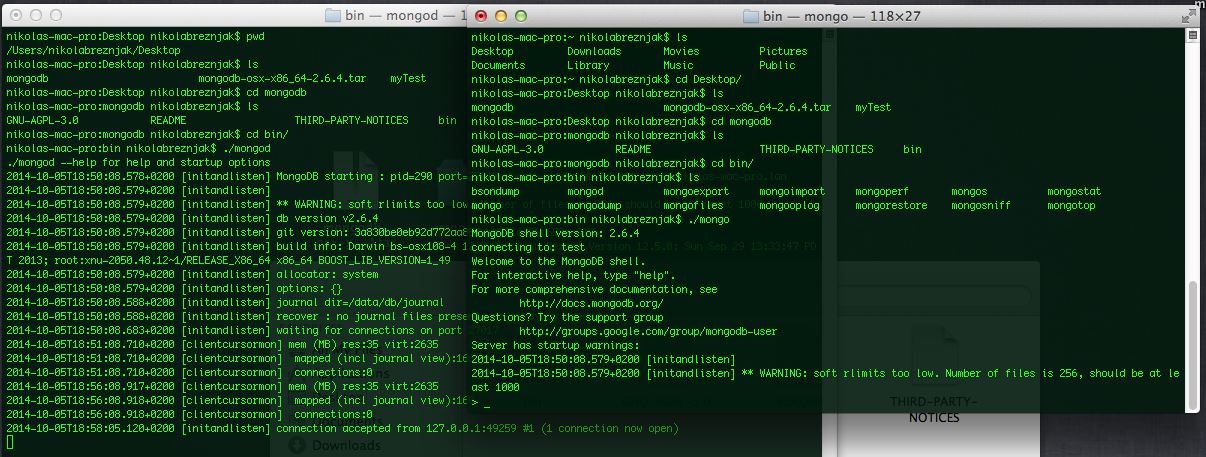 Click on the image for a larger version
To test the database, lets create a new todos collection by inserting a JSON object with the title property:
db.todos.insert({title: "Write a blog post"})
To retrieve the todos object, execute:
db.todos.find()
which will output:
{ _id : ObjectId("543262a625cc94a488de8466"), title: "Write a blog post" }
Now we have the MongoDB service working and we'll explore more options in the second post when we'll save the todos to our MongoDB database. If you wish to try out more features and get a short crash course on using MongoDB shell, you can do so on the official MongoDB page: http://try.mongodb.org/ where they offer a free interactive tutorial.
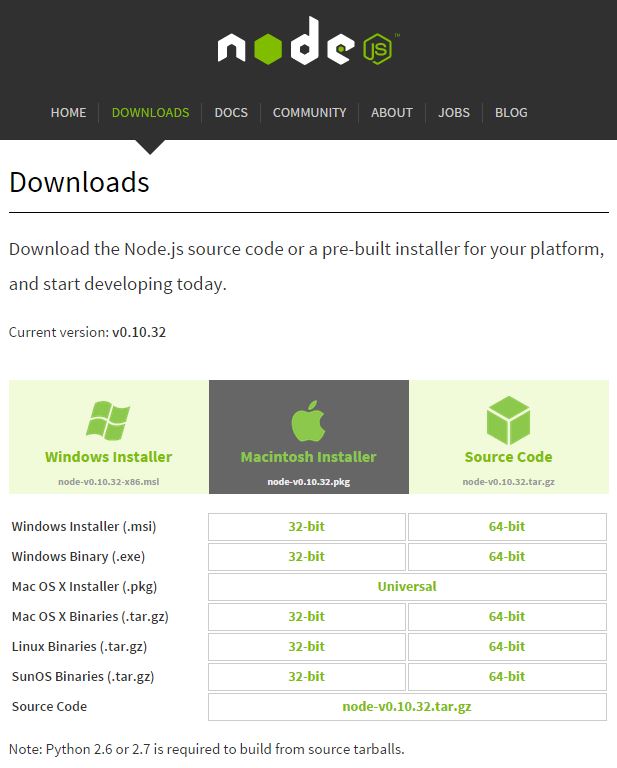
Installing Node.js
In order to download Node.js, visit http://nodejs.org/download/, where you'll see the following options:
Installation on Windows and Mac OS X is simple as you just have to run the installer and follow the instructions, and on linux it is a standard configure, make, make install procedure.
Installing Node.js on Linux
To install Node.js on a Linux machine, you first have to download the suitable .tar.gz file (into the /usr/srcfolder) from the official downloads page, and you can do that with the wget command (after you obtain the appropriate download link for your distribution):
$ cd /usr/src
$ wget http://nodejs.org/dist/v0.10.32/node-v0.10.32.tar.gz
Now, extract the archive and start the installation by executing the following commands:
$ tar -zxf node-v0.10.32.tar.gz
$ cd node-v0.10.32
$ ./configure && make && sudo make install
Running Node.js
After you successfully installed Node.js, you can execute the following command from your command line tool:
$ node
This will start the Node.js command-line interface (CLI) and wait for further commands. In order to test it you can execute the following command:
$ console.log('Hello World from Node.js');
which will output:
Hello World from Node.js
undefined
You can put the code sample from above in a JavaScript file and run it with node. Say for example you made a test.js file which contained the console.log statement from above, you would run it like this:
$ node test.js
and the output would be:
Hello World from Node.js.
Installing Express
To install express all you have to do is execute the following command:
$ npm install express
NPM is a Node.js package manager, which acts as a registry for public packages (you can view the available public packages at https://npmjs.org/). NPM has two installation modes: local and global. Local mode installs the package to a node_modules folder inside the actual application, whilst the global mode installs the package globally on the system, thus making it available to any other Node.js application. The global
mode will usually install the packages in the /usr/local/lib/node_modules folder
for Unix-based systems and in the C:\Users\%USERNAME%\AppData\Roaming\npm\
node_modules folder for Windows-based systems.
mode will usually install the packages in the /usr/local/lib/node_modules folder
for Unix-based systems and in the C:\Users\%USERNAME%\AppData\Roaming\npm\
node_modules folder for Windows-based systems.
To install the package globally you have to add the -g flag to the npm install command, like this:
$ npm install -g <package_name>
If a package that you want to install has some dependencies, NPM will automatically resolve them by installing the required packages in a node_modules folder inside the
package folder. You can also use commands for uninstalling a package (npm uninstall ) or updating it (npm update ) which both work with the -g flag.
package folder. You can also use commands for uninstalling a package (npm uninstall ) or updating it (npm update ) which both work with the -g flag.
Lets organize with package.json file
By putting a package.json file in the root of the application you get to define all the dependencies that your application needs, for example:
{
    "name" : "myMEANapplication",
    "version" : "1.0.0",
    "dependencies" : {
        "express" : "latest",
        "gulp" : "latest"
    }
}
and by issuing a simple
$ npm install
command inside the folder in which the packages.json file is placed, NPM will install both express and gulp for you automatically.
When starting the project it is useful to create a package.json file but you don't have to create it manually, instead you can use a shortcut command:
$ npm init
where you'll be asked few short questions about your application which will then create this file for you. When installing new packages, you can automatically save the package information as a dependency in the package.json file by using the --save flag:
$ npm install express --save
AngularJS
AngularJS is a frontend JavaScript framework designed to build single-page
applications using the MVC architecture. It's built and maintained by Google so this should give you a peace of mind. Few of the cool features are:
applications using the MVC architecture. It's built and maintained by Google so this should give you a peace of mind. Few of the cool features are:
- Two-way data binding, which synchronizes between models and views
- Extended HTML with additional attributes, which bind the JavaScript objects with HTML elements
- Improved code structure
- Easier testing through dependency injection
In order to downlod AngularJS, you have to visit https://angularjs.org/ and upon clicking on the download button a following popup will appear:
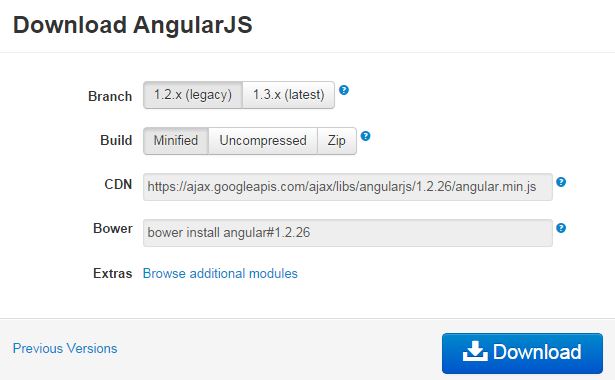
Since AngularJS is a frontend framework the installation is done simply by including the downloaded JavaScript file in your HTML (you can also use a CDN link if you like) like this for example:
<script src="https://ajax.googleapis.com/ajax/libs/angularjs/1.3.0-rc.4/angular.min.js"></script>
But, there is a better way to manage your frontend dependencies - with the tool called Bower. Bower is a package manager which makes it easier to download and maintain your frontend libraries. Since Bower is a Node.js module you can install it by executing:
$ npm install -g bower
However, in order to use Bower, you will need to get [Git](http://en.wikipedia.org/wiki/Git(software)) (distributed version control system) by going to http://git-scm.com/ and download/install it on your machine (the installation is a simple Next, Next, Finished type of installation). If you're unfamiliar with Git, they offer a free interactive online tutorial on their website https://try.github.io/ which will get you up to speed on using basic commands._
Once the Bower is installed you can use the following command to install Angular:
$ bower install angular
Bower places all of its files in the bower_components folder in the root folder of your application, namely in the folder where you executed the bower install command. To install your frontend packages in a different location, go to the root folder of your application and create a file named .bowerrc that contains the following lines of code:
{
    directory: mydir/jsscripts
}
Bower, like Node.js, uses a config file named bower.json where you can define your dependencies. In order to install AngularJS via the bower.json file, first put the following content in that file:
{
    name: MEAN,
    version: 0.0.7,
    dependencies: {
        angular: ~1.3
    }
}
and then execute:
$ bower install
This will fetch the AngularJS package files and place them under the mydir/jsscripts
folder. If you get an 'Unexpected token n' error, try the suggestions from StackOverflow.
folder. If you get an 'Unexpected token n' error, try the suggestions from StackOverflow.
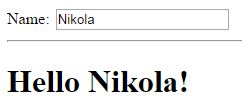
In order to test the AngularJS you can make a simple index.html file with the following contents:
<!doctype html>
<html ng-app>
  <head>
    <script src="https://ajax.googleapis.com/ajax/libs/angularjs/1.3.0-rc.4/angular.min.js"></script>
  </head>
  <body>
    <div>
      <label>Name:</label>
      <input type="text" ng-model="yourName" placeholder="Enter a name here">
      <hr>
      <h1>Hello {{yourName}}!</h1>
    </div>
  </body>
</html>
and after you open it up in your browser, enter some text in the textbox, you should see it immediately appear in the output like this:
Ok, we're nearing the end of this tutorial - hold on tight for just a little longer... Now we'll download a finished TODO MVC AngularJS application which we'll then use in the following tutorial. There is a popular site http://todomvc.com/ which implements a TODO application in various frontend frameworks so you can choose easier whose approach you like the best.
In order to download the application go to the GitHub link https://github.com/tastejs/todomvc (to obtain the correct source code path for git clone command) and clone the repository with git:
$ git clone https://github.com/tastejs/todomvc.git
Copy the angular example from the architecture-examples folder (edit: it seems that in newer versions the folder is named just examples. Thanks to the user Scott “Scottymo” Moore for pointing it out in the comments below) to your MEAN root app folder and open up index.html file in your browser, it should look something like this after you play with adding some todos:

So, that's it, we've installed all the required parts for our MEAN stack and we ran an existing AngularJS application. This will serve us in the upcoming tutorial where we'll dig deeper in the MEAN ecosystem by updating our todoMVC application to save the tasks to the MongoDB. Also, I'll explain how this todoMVC application works on the inside and how to make use of the Express to actually serve the files once on the actual server.
The second blog post, which is all about Node.js and Express is here.
Source url: How to get started on the MEAN stack
How to get started on the MEAN stack
![How to get started on the MEAN stack]() Reviewed by Nhung Pham
on
03:24:00
Rating:
Reviewed by Nhung Pham
on
03:24:00
Rating:


Thanks for posting such a Useful information .You have done a great job.
Trả lờiXóaFull Stack Online Training
Full Stack Training
Full Stack Developer Online Training
Thanks for Sharing this Information. Mean Stack Training in Gurgaon
Trả lờiXóaMean Stack Course in Noida
Trả lờiXóaMEAN Stack Training in Noida
Trả lờiXóa
Trả lờiXóaMean Stack Training in Noida
Mean Stack Training Institute in Noida
Trả lờiXóaMEAN Stack Training in Delhi
Trả lờiXóahttps://bumppy.com/tm/read-blog/46552_want-a-career-in-mean-stack-development-make-this-your-secret-weapon.html
APTRON known among the main ten MEAN Stack Training Institute in Delhi has prepared programs for fledglings, specialists, and experts. Whether you are an undergrad, IT expert, or undertaking supervisor; the amazing MEAN Stack Training in Delhi offers the best preparation offices, senior MEAN Stack coaches, and adaptability plans for all modules. Likewise, the great MEAN Stack Training in Delhi is requesting an expense for understudies. The educational expense structure for the MEAN Stack course can be paid for by understudies from varying backgrounds.
Best Blog get through MEAN Stack Basics and How to get started for MEAN Stack
Trả lờiXóaMEAN Stack Training in Gurgaon
Trả lờiXóahttps://bumppy.com/tm/read-blog/45182_things-when-you-first-start-mean-stack.html
If you are a working professional, looking forward to up-skilling yourself and obtaining specialization, APTRON weekend classes will enable you. We have specific software development classes on topics like MEAN Stack. Achieve your next career break with these specialization classes offered in APTRON, India’s best institute for MEAN Stack Training in Gurgaon.
Nice Blog. Thanks for sharing this article with us. Keep sharing in future.
Trả lờiXóaDo you want to be a MEAN Stack Developer?
MEAN Stack Developer